
Why Getting a CNC Router for Acrylic Cutting Right Matters From the Start
Quick Answer: CNC Router for Acrylic Cutting
| What You Need to Know | Key Detail |
|---|---|
| Best acrylic type | Cast acrylic — cleaner chips, better edges |
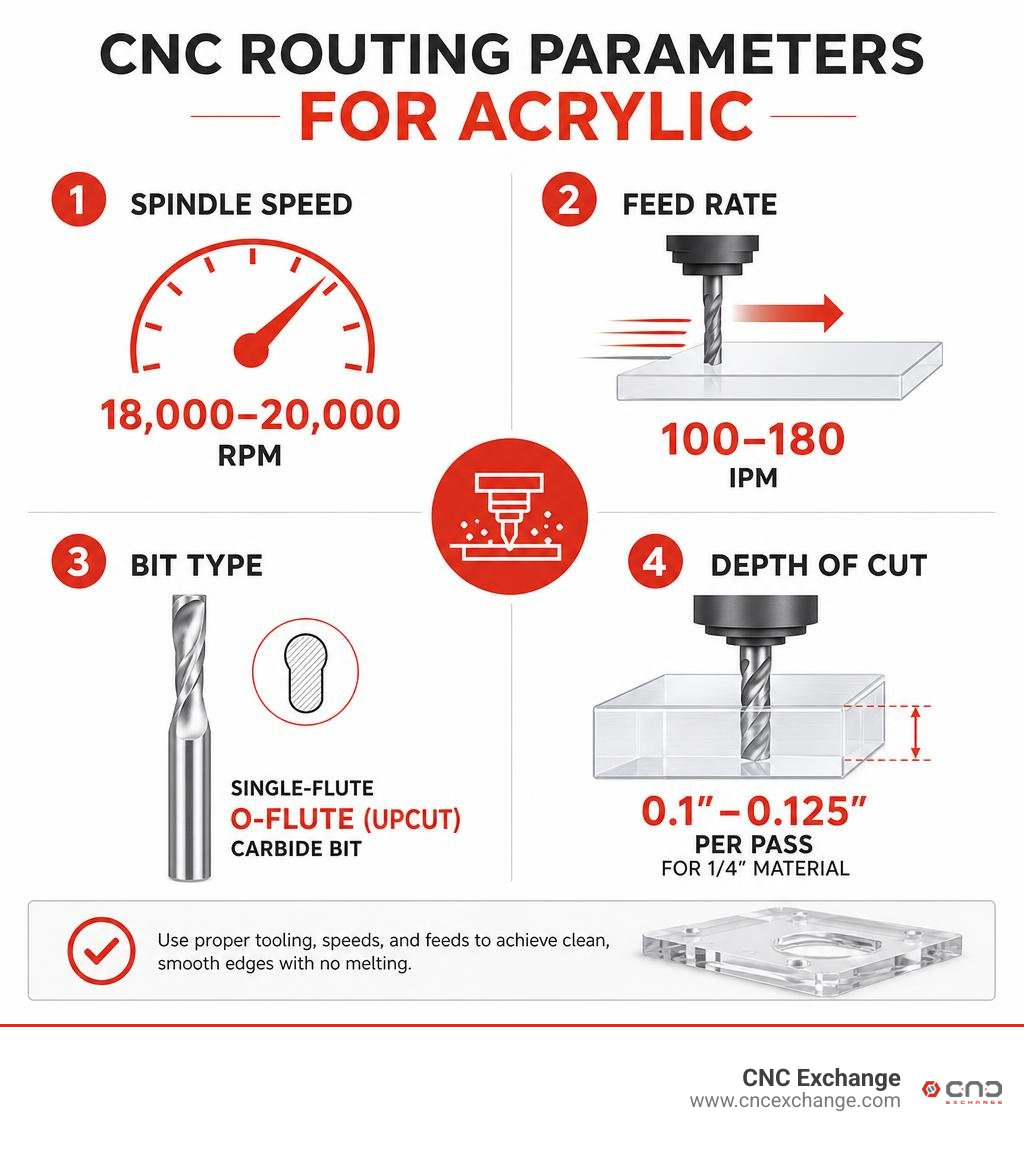
| Ideal spindle speed | 18,000–20,000 RPM |
| Ideal feed rate | 100–180 IPM for 1/4" acrylic |
| Best bit type | Single-flute O-flute upcut carbide bit |
| Depth of cut per pass | 0.1"–0.125" for 1/4" material |
| Biggest mistake | Running too slow — causes melting, not cutting |
| Key machine features | Vacuum table, dust collection, rigid steel frame |
Using a CNC router for acrylic cutting looks simple on paper — until you pull the first piece off the bed and find melted plastic fused to the edge, stringy chips wrapped around the bit, and a surface that looks more like it was chewed than cut.
This is one of the most common frustrations for shops moving into acrylic fabrication. The material is unforgiving when parameters are even slightly off. Too slow on the feed rate, and the heat builds up fast. Wrong bit geometry, and you're re-welding chips right back into the cut.
The good news? These problems are almost entirely preventable. With the right machine, the right tooling, and dialed-in feeds and speeds, acrylic cuts cleanly — producing smooth, nearly polished edges straight off the router.
This guide covers everything: material selection, machine specs, bit choices, feeds and speeds, workholding, CAM settings, and how to handle both acrylic and foam on the same machine.
I'm Jared Gray — with over 12 years of experience in CNC equipment, including buying, selling, and brokering machines specifically suited for plastic and acrylic fabrication, I've seen what separates a clean acrylic cut from a costly one. Whether you're evaluating your first CNC router for acrylic cutting or upgrading an existing setup, this guide gives you the practical answers you need.
Material Science: Cast vs Extruded Acrylic Performance
Understanding Acrylic Machining Characteristics
When selecting material for your shop, understanding the molecular difference between cast and extruded polymethyl methacrylate (PMMA) plastic is critical. While both types look virtually identical on the shelf, they behave dramatically differently under the cutting edge of a CNC router bit.
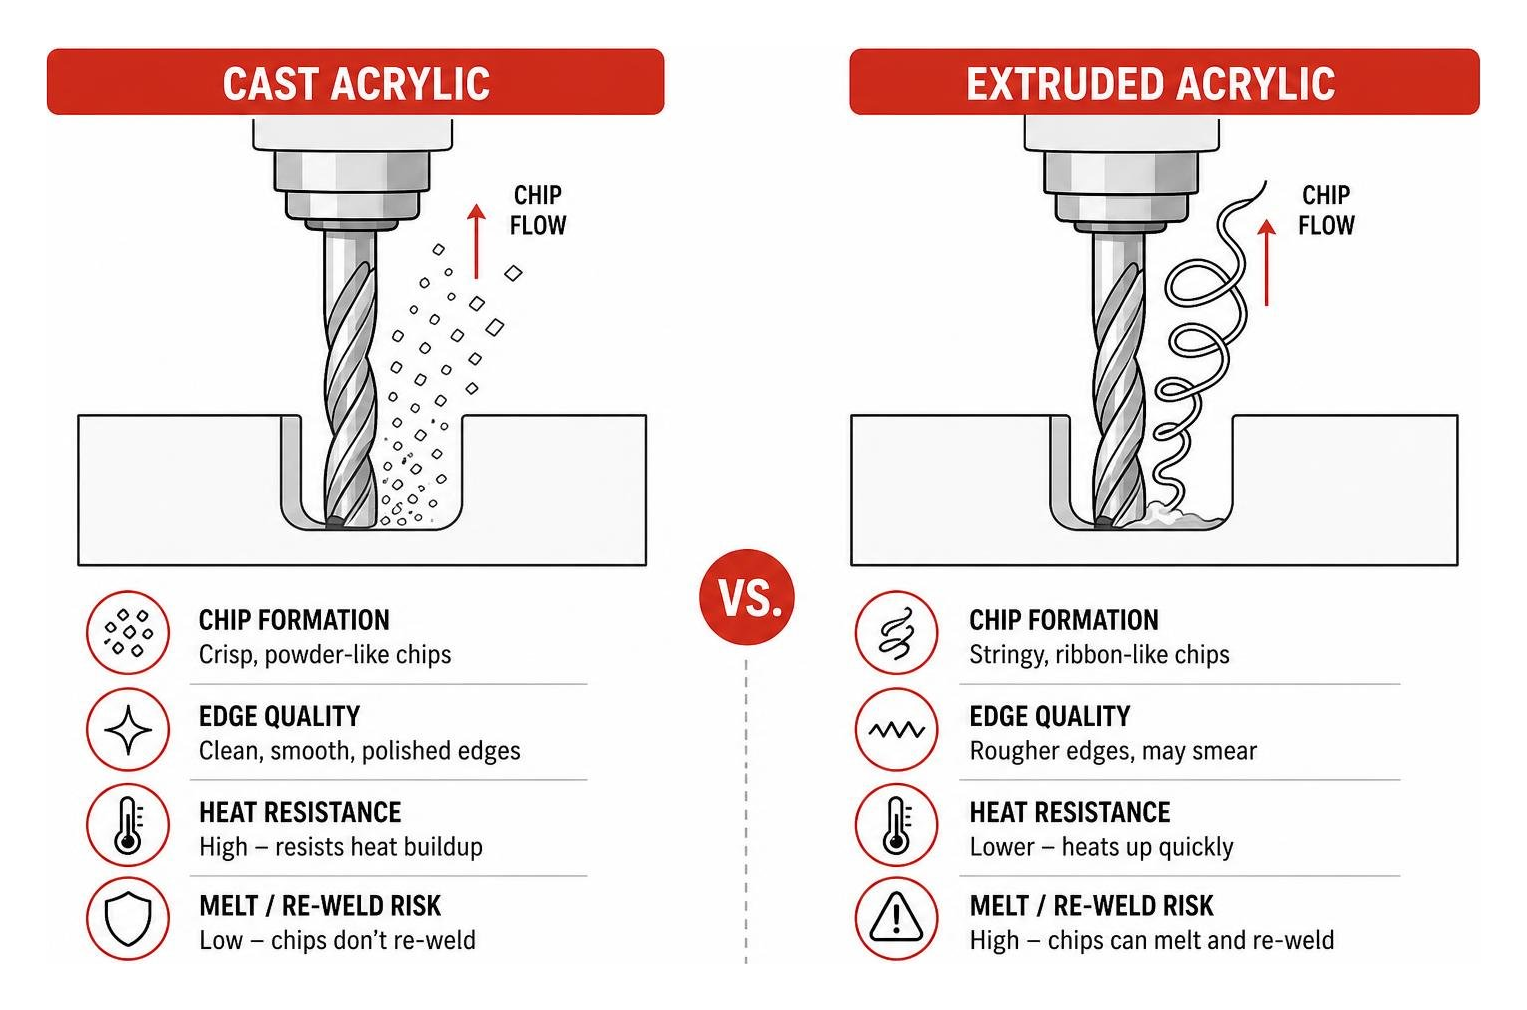
Cast acrylic is manufactured by pouring liquid monomer between glass molds. This process creates a high molecular weight structure with exceptional thermal resistance. When machined on a CNC router for acrylic cutting, cast acrylic breaks into crisp, powder-like chips rather than stringy ribbons. It generates clean, polished-looking edges, resists heat buildup, and is far less prone to melting. If your project requires heavy pocketing, intricate engraving, or flame-polished visual edges, cast acrylic is always the superior choice.
Extruded acrylic, on the other hand, is produced by continuously pushing molten plastic through a die. This results in a lower molecular weight sheet with a lower melting point. During machining, friction quickly raises the temperature at the cut site past its softening threshold. If your feed rate drops or your tool rubs, extruded acrylic melts, re-welding itself directly behind the endmill. However, extruded acrylic offers tighter thickness tolerances across large sheets, making it popular for high-volume, cost-sensitive signage where straight-line perimeter cutting is the primary requirement.
| Property | Cast Acrylic (Cell Cast) | Extruded Acrylic (Continuous) |
|---|---|---|
| Molecular Structure | High molecular weight | Low molecular weight |
| Melting Point & Heat Tolerance | High (resists melting during cutting) | Low (softens easily under friction) |
| Chip Formation | Crisp, powdery chips | Stringy, ribbon-like chips |
| Edge Finish Quality | Superior, clear, flame-polishable | Prone to burrs and micro-cracks |
| Engraving Results | Bright, frosted white contrast | Milky, uneven finish |
| Thickness Tolerance | Variable (+/- 10%) | Highly uniform |
| Ideal Applications | High-end displays, 3D relief, letters | Standard flat signs, simple cutouts |
For comprehensive guidelines on machine configurations and material behaviors, reviewing operational best practices and understanding cutter interactions provides excellent real-world context.
Foam Routing Fundamentals
Soft substrates like high-density polyurethane foam, expanded polystyrene (EPS), and ethylene-vinyl acetate (EVA) foam present the opposite engineering challenge of acrylic. Where acrylic is brittle and heat-sensitive, structural foam is highly pliable and low-density.
Cutting forces in foam are minimal, but edge quality depends heavily on balancing compression versus shear forces. If your cutter geometry pushes down on the foam instead of slicing through it, the material compresses under the tool bit and rebounds after the pass, leaving torn, fuzzy edges. Clean foam routing requires razor-sharp, polished carbide tools with high-helix flutes to shear the cell walls cleanly without tearing.
Selecting the Best CNC Router for Acrylic Cutting and Foam
Machine Specs: Spindle Power, Rigidity, and Accuracy
Machining plastics successfully requires a rigid frame and precise motion control. When a router frame flexes or vibrates during directional changes, cutter chatter instantly telegraphs onto the acrylic edge as visible ridges or frost marks.
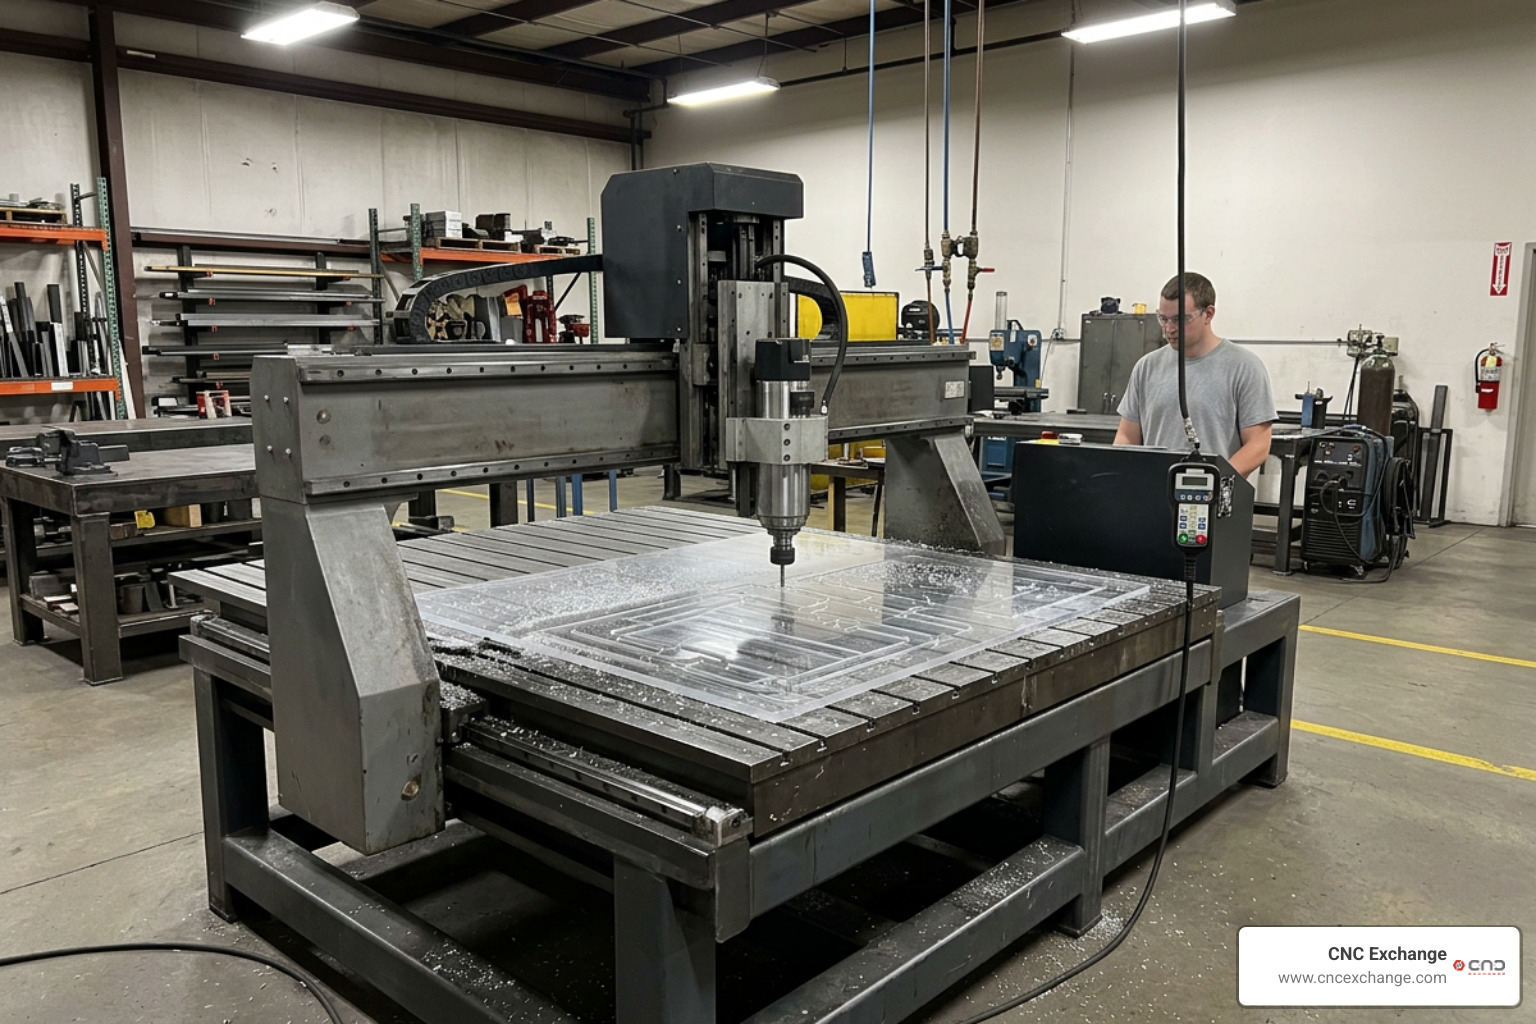
A high-performance machine should feature a stress-relieved cast steel frame or heavy-gauge gantry construction to dampen mechanical vibrations. For serious production, we look for key technical baseline specifications:
- Spindle Power: A 5.5kW (approx. 7.5 HP) to 9.0kW high-frequency spindle provides stable torque without bogged-down RPM under load.
- Spindle Speed Range: 18,000 to 24,000 RPM continuous operational capacity.
- Positional Accuracy & Repeatability: Positioning accuracy of +/-0.05mm (+/-0.002 in) with a repeatability of +/-0.03mm per 300mm to guarantee tight joint tolerances on fabricated acrylic displays.
- Drive Systems: High-precision helical rack-and-pinion or precision ball screw drives on all axes.
If you are looking for production-proven industrial platforms, pre-owned industrial units like the heavy-duty Thermwood C-70 CNC Router, Thermwood C50 CNC Router, or Motionmaster CNC Router offer massive frame rigidity that eliminates chatter on thick plastic sheets.
Essential Features: Vacuum Bed, Cooling, and Dust Collection
Beyond the primary machine structure, three auxiliary systems dictate whether your machine setup succeeds at high-speed plastic cutting:
- Multi-Zone Vacuum Table: High-flow vacuum systems (such as direct-drive regenerative blowers or rotary vane pumps) are mandatory when routing full sheets of thin acrylic or lightweight foam. Multi-zone control lets you concentrate suction under small parts to prevent them from shifting under cutter shear forces.
- Cold Air Pressurized Cooling: Liquid coolants can degrade acrylic or contaminate foam cell structures. Instead, use a vortex cold air gun or pressurized air blast system aimed directly at the bit tip. Cold air lowers tool temperatures, blasts chips clear of the kerf, and prevents chip rewelding without introducing chemical contamination.
- High-Velocity Dust Collection: Acrylic routing generates thousands of tiny plastic particles per second. High-capacity dust extraction prevents re-cutting previously cleared chips—a prime cause of thermal buildup.
Top-tier commercial equipment like the Onsrud Tech Series 145T12 CNC Router or the Axxis N255S4D1 CNC Router come equipped with industrial vacuum hold-down and high-velocity chip extraction manifolds designed specifically for continuous plastic fabrication.
Tooling and Feeds & Speeds for Smooth Acrylic Edges
Choosing the Right CNC Router for Acrylic Cutting Bits
Using standard double-flute or triple-flute straight woodworking bits on acrylic is a recipe for instant failure. Multi-flute endmills lack the internal flute volume needed to clear large plastic chips quickly, trapping heat inside the cut.
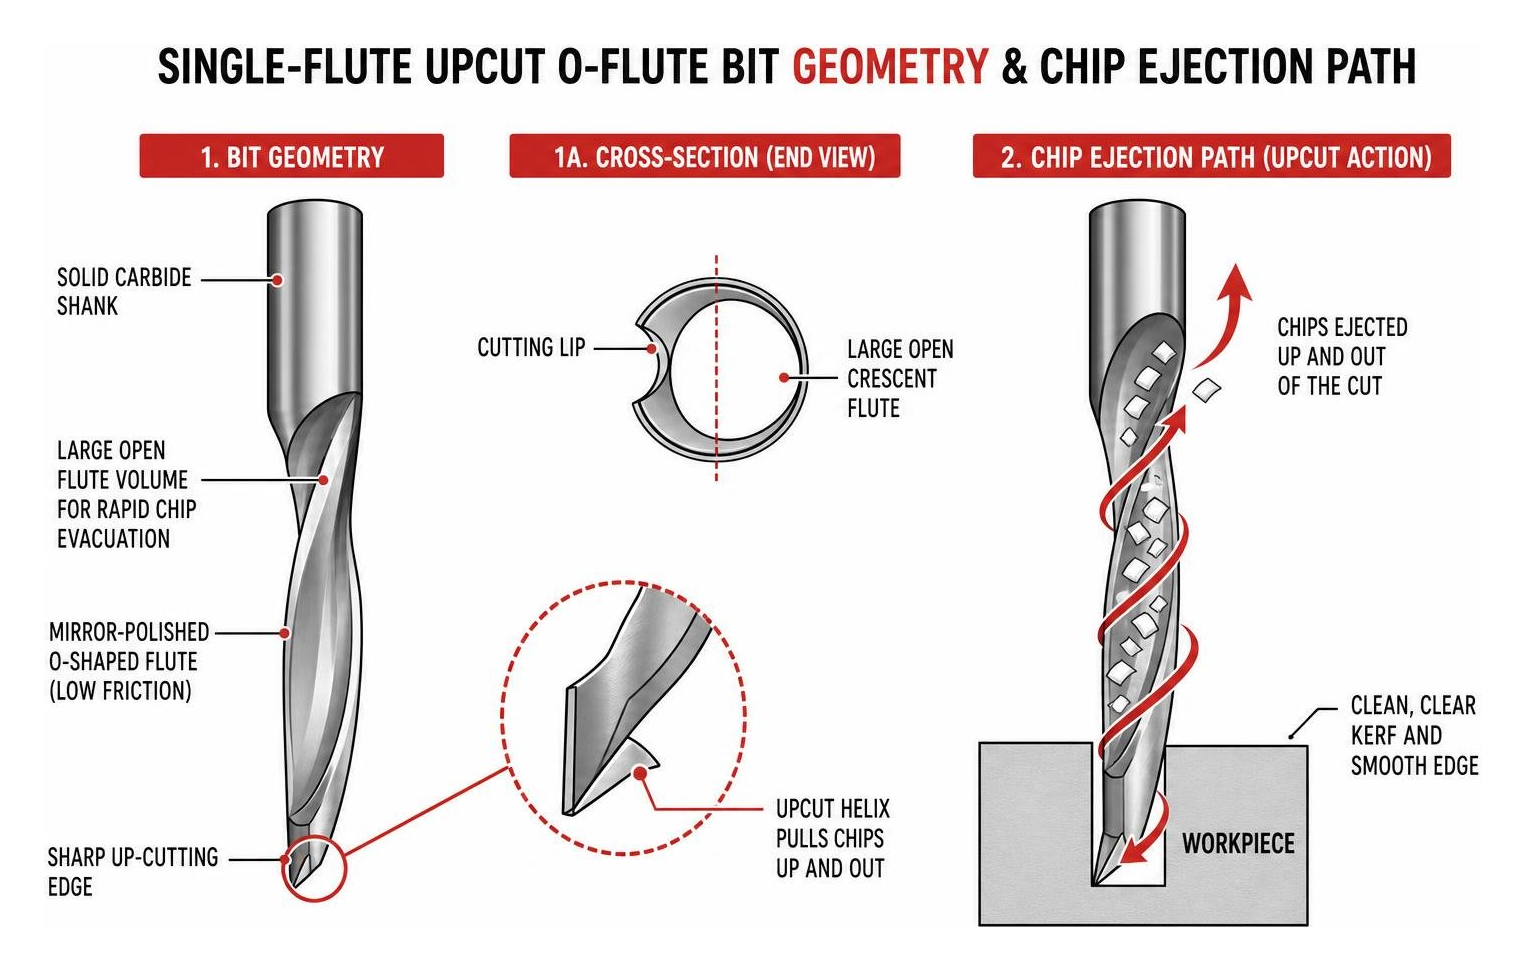
The absolute gold standard when setting up a CNC router for acrylic cutting is a solid carbide single-flute upcut O-flute endmill (such as the industry-standard Amana 51404-K or equivalent).
Here is why O-flute tooling excels:
- Mirror-Polished Flute: The interior crescent of an O-flute bit features an ultra-smooth, polished curvature that minimizes plastic friction and prevents sticky melted acrylic from adhering to the bit.
- Maximum Flute Volume: Because it has only one cutting edge, the tool possesses a massive open valley for rapid chip evacuation.
- Upcut Spiral Action: The spiral design pulls chips up and out of the cut trench immediately, preventing chip re-welding.
For ultra-high-end optical edge finishes on thick acrylic sheets (such as 1-inch to 3-inch thick display panels or aerospace viewing ports), high-precision diamond-coated or PCD (Polycrystalline Diamond) finishing bits deliver glass-like edges that eliminate manual edge polishing entirely.
Calculating Speeds, Feeds, and Pass Depth to Prevent Melting
The key formula to master when machining acrylic is chipload. Chipload is the thickness of the material chip removed by each cutting edge during one revolution of the spindle.
$$\text{Chipload} = \frac{\text{Feed Rate (IPM)}}{\text{Spindle Speed (RPM)} \times \text{Number of Flutes}}$$
If your chipload is too small (e.g., feeding too slowly at high RPM), the tool bit rubs against the material rather than slicing a clean chip. This rubbing friction generates immediate thermal energy, melting the acrylic. To keep the process cool, heat must be transferred into the chip and thrown away from the workpiece.
Here are proven target parameters for cutting 1/4-inch (6mm) acrylic using a 1/4-inch single-flute carbide O-flute upcut bit:
- Target Chipload: 0.002 inches per tooth
- Spindle Speed: 18,000 RPM
- Calculated Feed Rate: 100 to 180 IPM (Inches Per Minute)
- Depth of Cut (DOC): 0.100" to 0.125" per pass (40% to 50% of cutter diameter)
- Plunge Rate: 20 to 25 IPM (plunging slowly melts plastic at the tool tip before lateral movement begins)
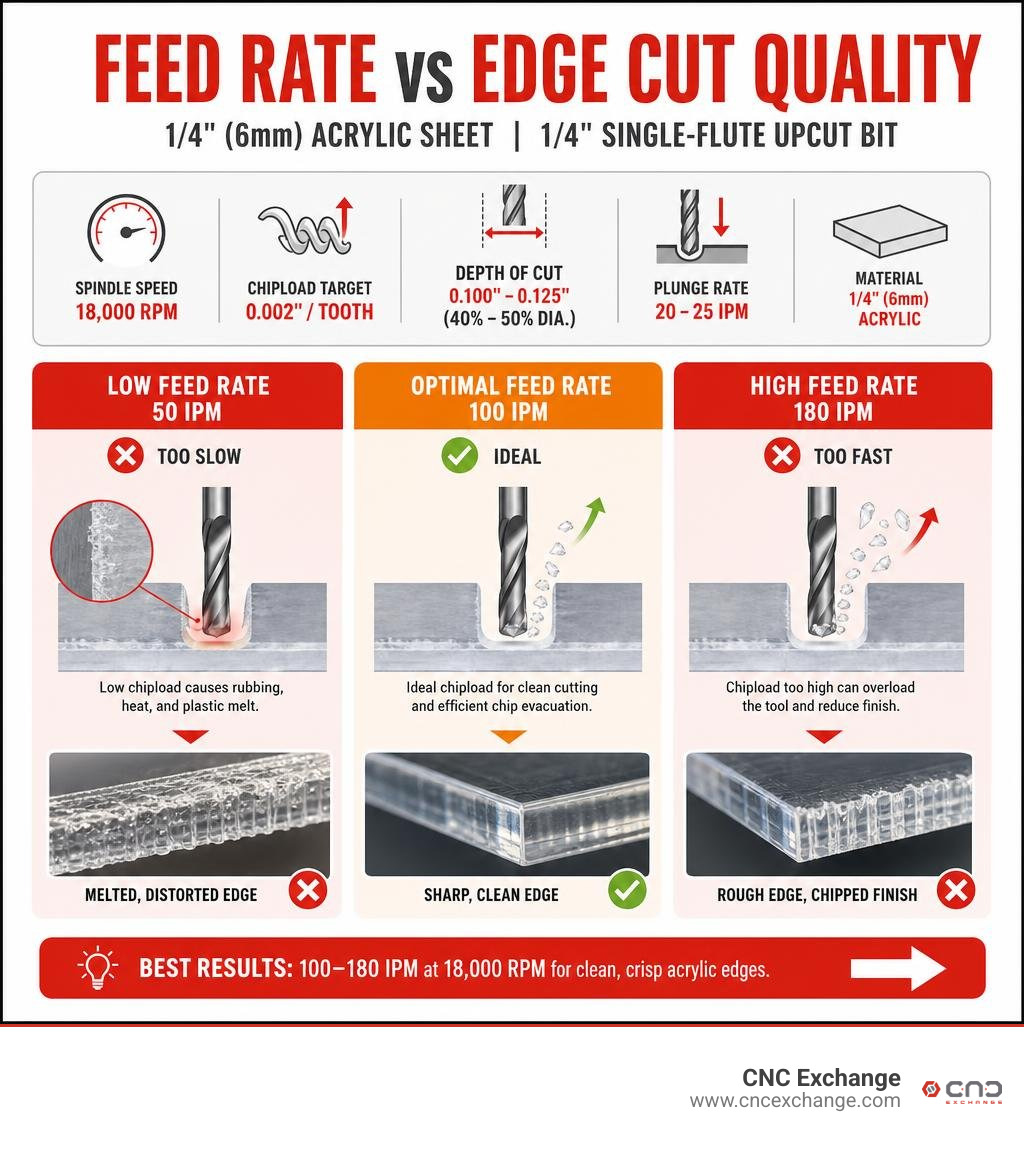
A real-world test illustrates this clearly: running a 1/4" single-flute tool at 12,000 RPM and 50 IPM produces melted, distorted edges due to low chipload rubbing. Increasing the feed rate to 100 IPM at 18,000 RPM yields sharp, crystalline edges with clean chip ejection. On high-powered industrial machines with rigid gantries, operators successfully cut 1/4" cast acrylic in a single full-depth pass at 180 IPM and 18,000 RPM.
Advanced CAM Settings and Workholding Best Practices
Fixturing Techniques and Sheet Securing Methods
Proper workholding prevents sheet chatter, micro-vibrations, and part movement during cut-out operations.
- High-Flow Vacuum Hold-Down: Ideal for large sheets. Ensure spoilboard surfaces are freshly surfaced and non-porous tape is used to seal open vacuum zones.
- Painter's Tape and Super Glue (CA Glue): For smaller desktop routers or intricate parts where vacuum suction is unavailable, apply blue painter's tape to both the machine bed and the bottom of the acrylic sheet. Apply cyanoacrylate glue with an activator between the tape layers. This holds parts firmly down to 0.001" tolerances and releases cleanly without leaving sticky residue.
- Retaining Protective Masking Film: Never peel off the factory paper or film masking prior to routing. The masking stabilizes surface edges, prevents chip scratching, and leaves a clean edge line upon removal.
Adjusting Toolpaths on a CNC Router for Acrylic Cutting and Engraving
Machining clean acrylic parts requires strategic CAM toolpath programming:
- Ramping Entry: Never plunge straight down (Z-axis vertical plunge) into acrylic. Program a smooth 3D ramp or helical entry over a distance of 1 to 2 inches. This distributes entry forces and prevents melted plastic strings from wrapping around the bit shank.
- Two-Pass Cutting Strategy: For pristine display edges, run a roughing pass leaving a 0.015" to 0.020" wall offset, followed by a full-depth single finishing pass removing that final sliver of material at high feed speeds.
- Climb vs. Conventional Cutting: Climb milling generally produces a smoother surface finish on rigid cast acrylic, whereas conventional milling can reduce chatter on thinner or slightly flexible sheets.
Maximize CNC Router Capabilities for Soft Substrate Fabrication
Combining high-speed CNC routing hardware with versatile tooling setups allows a single machine to transition seamlessly from precision acrylic sign-making to custom foam packaging inserts or structural non-ferrous parts.
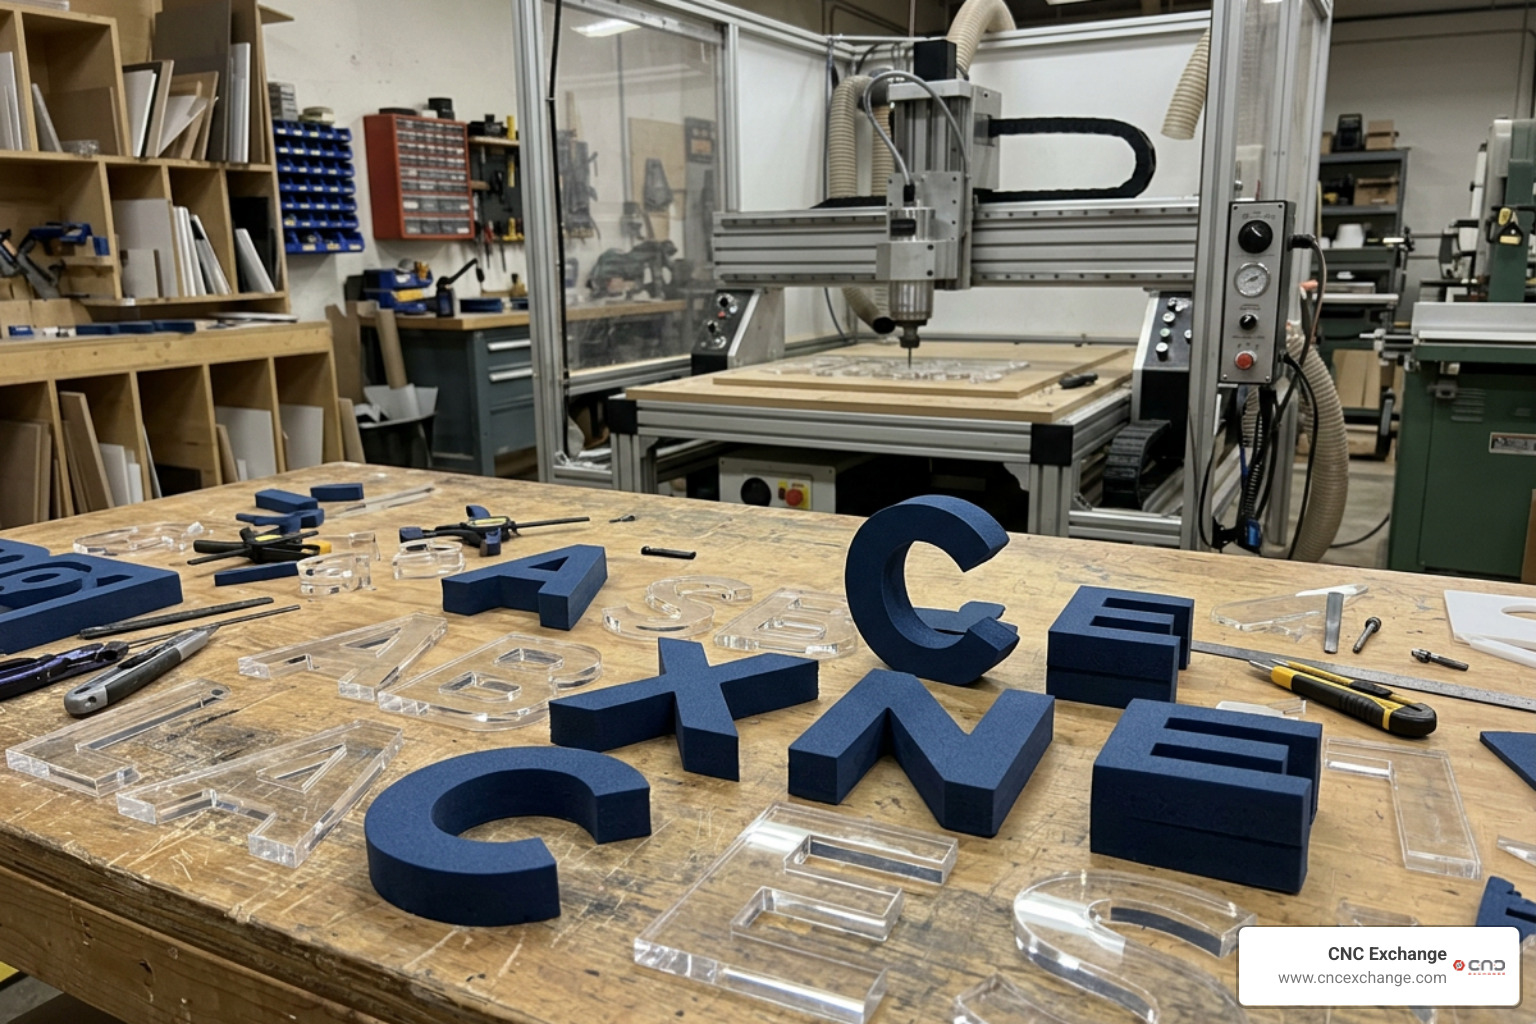
High-end multi-material equipment—such as the heavy-duty Multicam 5000 Series CNC Router, Haas GR510 CNC Router, or SCM Morbidelli N100 15-C CNC Router—gives shops the rigidity and spindle bandwidth to handle both dense 3-inch acrylic blocks and thick structural foam panels without structural deflection.
When compared to laser cutting systems, mechanical CNC routing holds distinct production advantages:
- Depth Control & 3D Contour Milling: CNC routers excel at precision pocketing, countersinking, drilling, and 3D relief modeling that lasers cannot replicate.
- Thickness Capability: CNC routers easily cut thick acrylic panels (up to 2–3 inches thick) that exceed standard laser cutting limits.
- Material Versatility: Routers process materials like PVC, polycarbonate, and foam without generating toxic chemical fumes or burnt, discolored edges.
Shops utilizing versatile machinery like the Holz-Her Dynestic 7516 CNC Router or Weeke Optimat NBP084/Vantech 480 CNC Router achieve max throughput by combining automatic tool changers with optimized CAM libraries tailored for each soft substrate.
Frequently Asked Questions About CNC Routing Acrylic
Why is my acrylic melting and wrapping around the router bit?
Melting is caused by excessive friction heat buildup at the cut site. This happens when your spindle RPM is set too high relative to your forward feed rate (IPM), or when you use a multi-flute endmill that traps chips inside the cut channel. To fix melting, switch to a single-flute upcut O-flute bit, increase your feed rate to 100+ IPM at 18,000 RPM, plunge into the material quickly (20–25 IPM), and use an air blast to evacuate chips instantly.
Should I remove the protective masking film before routing acrylic?
No. You should leave the paper or plastic protective masking film attached to both sides of the acrylic sheet during CNC machining. The masking protects the surface from dust scratches, prevents corner chipping, and seals edges during vacuum hold-down. Peel the film off only after all routing and deburring operations are complete.
Can I cut both thick foam and acrylic sheets on the same CNC router?
Yes! A modern 3-axis industrial CNC router can cut both soft foam and rigid acrylic sheets easily. When transitioning from acrylic to foam, adjust your parameters: switch to a high-helix, long-reach carbide endmill, lower spindle speeds to around 10,000–12,000 RPM, increase feed rates up to 200–300+ IPM, and ensure your gantry Z-axis travel clearance accommodates the thicker foam stock.
Conclusion
Mastering a CNC router for acrylic cutting and soft substrate fabrication comes down to understanding material science, selecting the right single-flute tooling, and maintaining proper chiploads to throw heat away from the workpiece. By replacing friction rubbing with clean chip shearing, your shop can produce smooth edges, precise pocket dimensions, and crystal-clear visual quality on every project.
When you are ready to expand your shop's capabilities or upgrade to a high-rigidity industrial platform, working with an experienced machinery partner makes all the difference. At CNC Exchange, we help shops buy, sell, and auction top-tier pre-owned machinery—ranging from robust multi-axis routing centers to precision turning equipment—ensuring you get maximum equipment value and the exact technical specs required for your production goals.
To view current inventory or discuss equipment upgrades with our machinery experts, Explore Industrial Machinery and Tooling Options today!